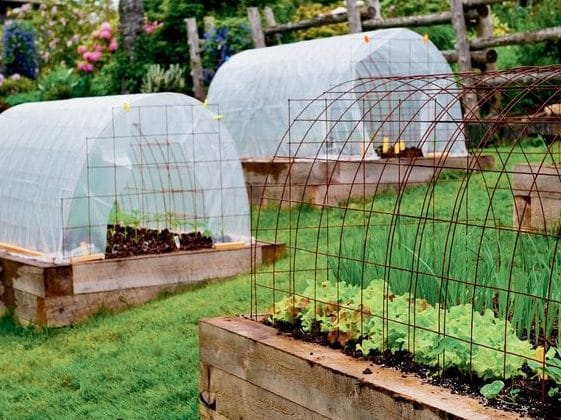
When it comes to boosting production in a vegetable garden, the versatility of mini-hoop tunnels can’t be overstated. Though commonly used to stretch the harvest season into late autumn and winter, mini-hoop tunnels also have an important place in the spring and summer garden. These simple structures can be used to pre-warm soil, shelter early-planted crops or provide a shaded spot for bolt-prone vegetables such as lettuce and arugula in the heat of summer. Depending on the width of the bed and the materials used to construct the hoops, a mini-tunnel is generally two to three feet (60 to 90 cm) tall at its highest point and can be as long as required.
Pre-warm the soil
Many vegetables benefit from a pre-warming of the soil, which boosts germination rates of direct-seeded crops and reduces transplant stress for seedlings. Mini-hoop tunnels that had sheltered winter crops can be left in place, or new ones can be erected as early as possible in spring to capture solar energy and warm the soil before planting. Allow at least two weeks for loam-based garden soil to warm and up to six weeks for clay-based soils.
Accommodate early planting
Depending on the crop, a mini-hoop tunnel will enable you to plant seeds or seedlings two to eight weeks before the last expected spring frost, significantly earlier than if planted in open garden beds. Cool- and cold-season vegetables, such as broccoli, kale and carrots, can be direct-seeded or transplanted beneath the shelter of a tunnel four to eight weeks earlier, while warm-season crops, like tomatoes, artichokes and peppers, are best planted just two to four weeks before the last frost. The temperature inside a mini-hoop tunnel can rise quickly, even on cloudy days. Open the ends for venting when temperatures are above 4°C.
Create shade in summer
With the first hint of summer, many cool- and cold-season salad greens, such as spinach and lettuce, quickly bolt, causing the leaves to become bitter and unpalatable. If sheltered from the sun and given ample moisture, however, these greens will continue to crop into summer. The easiest way to provide shade is to remove the plastic and float a length of shade cloth on top of the hoops of your tunnel.
Mini-hoop tunnel how-to
Mini-hoop tunnels can be bought as kits or you can make your own out of a variety of easily sourced materials. For my tunnels, I use 10-foot lengths of ½-inch-diameter PVC pipe, one-foot lengths of rebar and 6-mil greenhouse poly, which is long-lasting and durable.
Pound the rebar stakes six to seven inches (15-18 cm) into the ground, spacing them about three feet (90 cm) apart, along the length of the bed. Repeat on the other side so that the stakes are opposite each other and parallel. Take a 10-foot length of PVC and slip each end over two opposite rebar stakes. This creates a hoop to support the length of plastic, row cover or shade cloth. Once the covering is in place, secure it with clips or weight it down with rocks, logs or sandbags.
Even if you don’t plan on using your mini-hoop tunnels for winter harvesting, consider constructing the framework of the tunnel in late autumn to save you time and frustration in the spring, when muddy or still-frozen soil can make it difficult to insert the stakes into the ground.
Mini-hoop planting schedule
Cool- and cold-season crops: Plant these six to eight weeks before the last expected spring frost.
- Cabbage
- Broccoli
- Kale
- Lettuce
- Spinach
- Beets
- Carrots
Warm-season crops: Plant these two to four weeks before the last expected spring frost.
- Artichokes
- Tomatoes
- Peppers
- Eggplants
- Melons

Leave a Reply to Jane C. Cancel reply